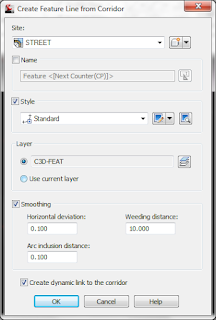
The fist step we want to do is create a dynamic feature so that our curb return will tie down to at the intersection edge of pavement. You do this by going into your corridor pull-down, and then select utilities. Then select “create grading featureline from corridor”.
Select the left edge of pavement for the left lane of our roundabout. The create featureline from corridor dialog box will appear. If you know your main road profile is not changing and your left lane roundabout is not change you do not have to check the dynamic link option.
The next step for part 2 is to create a null assembly. In addition, you should also have a curb return radius assembly created.
Next we want to use the intersection feature where my secondary road meets the centerline of our left lane of our roundabout. As you can see below I used my null assembly for most of my intersection sections.
Now go into your corridor properties./ Parameters tab/. Locate your 2 curb returns and select Targets. Make sure that you set the curb return frequencies to 5 or less.
What we want to do here is to set the target alignment and profile for our curb return. Set your object target to featureline at the top. Then choose the “select from drawing option”. Select the featureline that we just created at our intersection. Do this also for your elevation targets also,by using the same featureline.
Now hit apply then ok. Your intersection should look somewhat like this below.
I will post a video tomorrow on step by step on how to do this. The next part we will work on is the surface grading and editing. If you have any questions .


oh, i see it. Thank you very much :)
ReplyDeletepost the video please. Thanks you. i'm waiting :).
ReplyDeleteor please send me the video (or link of video) at dtpro_tk@yahoo.com . Sorry for my bad english is not enough to describe more