Monday, February 20, 2012

My Thought On Grading With Polylines

Hi everyone. I finally got some breathing time. So today during lunch I thought about what would be a great topic to write about. Well I think when dealing with civil engineering, grading design plays a very important part. As we all know, there are many different methods on how to grade. For example, you can do grading with corridors, featurelines. grading groups and points on so on. I have read every books and blogs and I have notices most designers like to use the minimize flat area feature when adding polylines as contours to a surface. After several discussions with our engineers and surveyors, we have learned that the finish product created by C3D in this method does not meet company standards. Though it may look correctly in 2d or on paper, once the survey department begins staking, you will being to get a lot of questions specially along swales. In this post I will show you how I typically do my design grading for areas with large number of swales with polylines.

The image below is the design grading for the subdivision lots, created with polylines (with assigned elevations).


Here I used the typically way most books tell you how to add contours data to a surface. Notice the minimized flat features that was selected.


After the polylines were added, here is what C3D came up with. (See image below) The surface looks correct on paper but is it really correct?


When I looked at the surface in object viewer, I noticed that my swale do not look smooth. Not quiet correct.


In this image, I turned on my tin lines and points in my surface style. Notice all the random points that were added to surface.


 For my final test, I did a quick profile across the swales. As you can tell the swale is incorrect. The profiles shows no swale.


After several practice test I found that the only way to correctly do lot grading that meets company standards is by using theses procedures below.

First select all you polyline contours and add by contours. The Add Contour Data dialog will appear. Turn off all the minimize flat area features. See image below. The weeding and supplementing factors is up to you on how tight you want your curve contours to be displayed.


After the surface was built this is what C3D came up with. As you can tell the contours are not quiet correct, specially at the nose of the swales.


In this image I turned on the tin lines and points. One great thing is I don’t have a a bunch of random points in my surface.


After spending some time swapping tin lines at the noses of the swales here is what the finish product should look like at all of your swales. (See image below)


Here is what my swale looks like in object viewer. As you can tell, the swale looks much smoother and is designed correctly.


In the image below I placed a spot grading to compare the two different methods. In the first method, the spot elevation in the swale was 633.96. In my surface design method, the same point grade is 633.37. That’s a big difference to me.


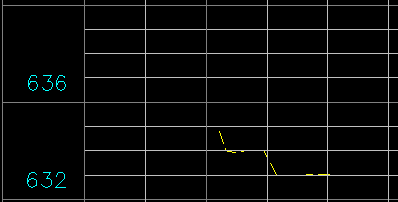
In my final design test, I did a quick profiles at the same location across the swales. The profile clearly shows the swale and the top of the berm.


In conclusion, I personally think this is the best method when grading with polyline contours. Even though it will taking you longer with your design because of the tin swapping that will take place, you will end up with a more accurate surface. On top of that, you will get a more accurate cut/fill calculation when doing subdivision dirt numbers. It could make a difference of 1,000 cubic yards or more depending on the size of the site.. Anyways, I hope you enjoyed the post. Feel free to make comments.

Tuesday, January 10, 2012

January knowledge Base

Good morning everyone. Wow these last 2 months has been crazy busy for me with Thanksgiving, Christmas, New Years and trips to California and Kansas. In addition, work has picked up so things are busy at work also.

Anyways I have posted below Autodesk January’s posted known issues. The tip of the week that I have for you is after you have finished creating your existing surface I would lock your existing surface and also lock the layer that your existing points and featurelines are on. You definitely don’t want to be working on your proposed grades and later find out that you or someone has accidently deleted the existing featureslines which changed the way your existing surface looks now. Trust me I know this from a past experience. Anyways I’m working on the roundabout training DVD that I mention last month. I am hoping I can finish it this week. Stay tune. Anyways thank you all that have emailed me and posted comments. I have not forgotten you.


Resetting User Settings

Resetting user settings for AutoCAD Civil 3D 2010

Resolving user specific issues by resetting AutoCAD Civil 3D 2011

Resolving user specific issues by resetting AutoCAD Civil 3D 2012

Exported Civil 3D Drawing Labels do not display at elevation

Friday, December 23, 2011

Assigning a Color to a New Layer Problem

Good morning everyone. I hope everyone is enjoying their xmas week. Just a few more days before I go back to San Diego to spend time with my daughter I can’ wait.

Anyways for the past few weeks my coworkers and I have noticed a problem with assigning a color to a new layer in C3D 2012 and it not staying. I researched the issue on Autodesk discussion board and other people were having the same issue. I informed Autodesk and I was told their were aware of it and there was not fix for the issue at the time.

Well 2 days ago I decided to seat down and find a work around for it. Here is what I ended up with. When you create your new layer you have to hit enter to exit out of the new layer command. Then you can assign the color and make it current. If you try to assign the color while in the new layer command, the color will change as soon as you exit out of the layer manager. See video below. I want to clarify that this problem has not affected very one using C3D 2012.


Enter video caption here

Wednesday, December 14, 2011

Best AU Class of 2011

Good morning everyone. Now that AU-Con (like Comic-Con lol) aftermath is over, I would love to hear about which class was the best of the best at AU-Con 2011, for those of you that had the privilege to go. Feel free to post below. I am definitely going to go next year for my first time.

Tuesday, December 13, 2011

TIP OF THE WEEK

Good evening everyone. I hope everyone is having a great xmas month so far. Sorry I haven’t posted in a while, I have lots going on with a second job now. Plus getting ready for the xmas and new years lol.

Anyways, the other day one of my engineers ask if the was simple way to remove Carlson points from base drawing but leave the tree description so he could send it to a client? Our Carlson point are cogo blocks displaying 3 attributes. (point number, point description, and point elevation) After a few minutes of thinking, I remembered the BURST command. For those of you that use Carlson cogo points for surveying, know that you cant just simply use the layer isolate feature to isolate the the point attributes. If you do all you will get is the point marker. You have to actually go into layer manager and turn on the description, point number, and point elevation layers. See image below.

2011-12-13_2102

Ok at this point, some of you might say “just simply explode the cogo points”. Well if you do that, you will lose all the attribute data. See image below.

2011-12-13_2115

To get around this problem, you will use the BURST command. What this does is actually separates your cogo point block attribute data into their individual layer. So it’s kind of like a explode and extract feature. After I typed my burst command and windowed all the cogo point, I was then able to use the layer isolate feature to isolate the point number and point elevation layer and delete from my drawing. My engineer was shocked after I completed this task within 1-2 minutes for home.

2011-12-13_2119

Anyways I just thought this was a cool command that everyone should know. I hope everyone has a great week.

Monday, November 14, 2011

Knowledge Base for November

Hi everyone. Sorry I haven’t posted lately. Here is Autodesk’s posted known issues. I will try to do part 2 of Civil 3D 2012 this week. In addition, I will also do a post on catchments and labels. Thank you all those that have emailed me about the training videos. I am currently working on the pipe network DVD first. I will have it done this week. As soon as they are ready to be shipped out, I will send emails out and post on here on how to order the training DVD’s. Because of the popular demand, I have decided to create a roundabout DVD. The DVD will basically be the city user group presentation I did few months ago. A handout will also be included with the DVD. Anyways, thank you all for emails and comments. Have a great week.

Delete Used Layers In Civil 3D

3rd party application, AutoPlant, is crashing

3rd party application, CADconform, is crashing